JavaScript is not currently enabled, but is required for full CodeSonar manual search and browse functionality.
If you are viewing this file in your hub's Web GUI, enable JavaScript in your browser: you will also need it for GUI functionality.
If you opened this file directly from disk, your browser may be directly suppressing JavaScript functionality: certain browsers perform this suppression on local files (but not files delivered by web servers) for security reasons.
| CodeSonar® 9.2p0 | CONFIDENTIAL | CodeSecure Inc |
Once you have installed the CodeSonar plug-in for Visual Studio and analyzed a project or imported an analysis, you can view the analysis results inside Visual Studio. The plug-in also provides functionality for editing warning properties.
The CodeSonar Visual Studio plug-in presents analysis results in the Visual Studio GUI.
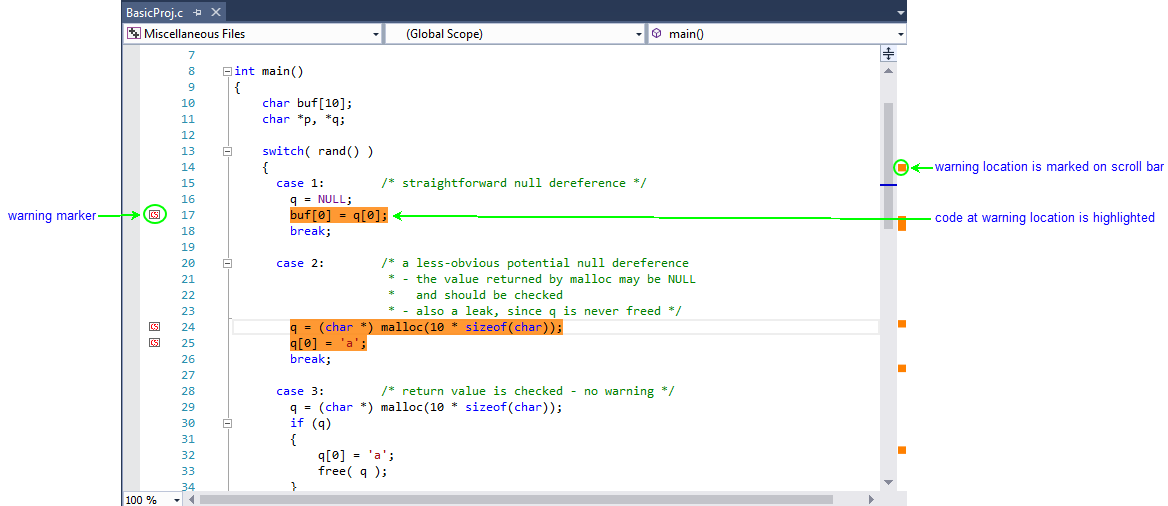
Information about the CodeSonar warnings issued in each source file is overlaid on the Visual Studio source listings, as shown in the following screenshot.


Warning markers and the corresponding location highlighting can be enabled and disabled from the CodeSonar menu (in the main Visual Studio menu bar).
The styling used for warning location highlighting can be enabled and disabled from the Options dialog.
The Analysis Report view provides information about a project's current analysis and its results.
The following annotated screenshot shows the various parts of an Analysis Report view.
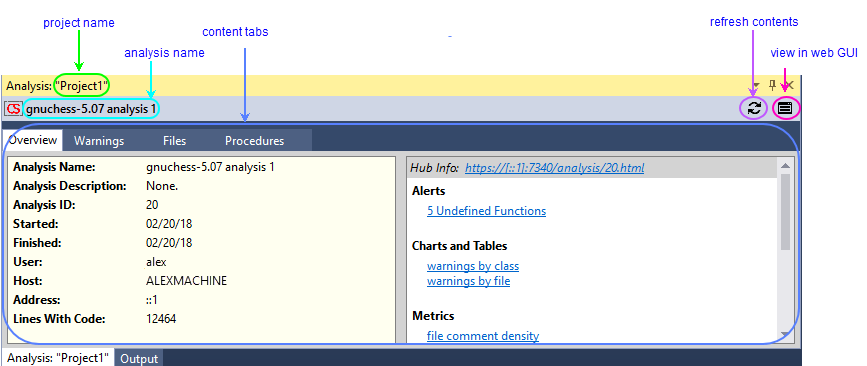
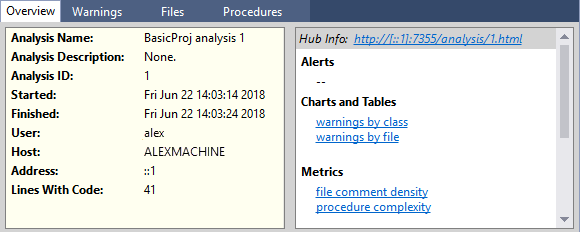
The Overview tab has two panels: one with analysis information, and one with links to additional information that is presented in the CodeSonar Web GUI.
| Analysis Information |
Basic analysis
properties:
|
|---|---|
| Links |
Links to information presented in the web GUI are divided into labeled sections.
|
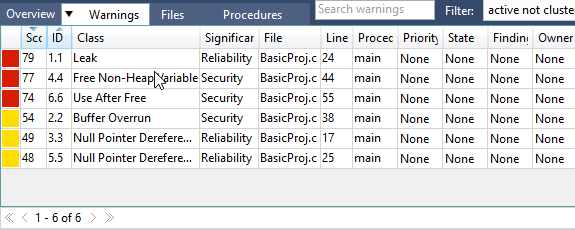
The Warnings tab contains a table of the warnings issued by the analysis, and provides functionality for searching and filtering these warnings.
| table of warnings |
The warnings issued by the analysis, or a subset defined by the
warning filter setting and the
most recently executed search (if
any). There is one row for each warning, with columns as
follows.
Table rows are interactive:
The table can be sorted.
|
|---|---|
| selecting classes |
If you only want to display warnings of certain classes:
|
| warning search field |
To search within the set of warnings issued by the analysis:
|
| warning filter |
The options available from the Filter menu correspond to the names of
saved searches in the Warning domain.
Select a filter from the menu to filter the table contents
according to the corresponding search constraints. This menu corresponds to the Visible Warnings selector in the web GUI. See GUI Reference: Visibility Filter selector for information about the built-in filters and instructions for viewing the conditions associated with a saved search, removing a saved search, and creating a new saved search. |
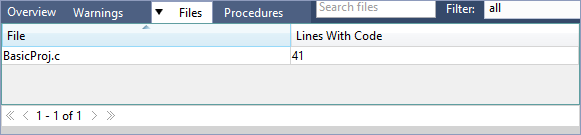
The Files tab contains a table of the files analyzed by the analysis, and provides functionality for searching and filtering these files.
| table of files |
The files in the analysis, or a subset defined by the file filter setting and the most recently
executed search (if any). There is
one row for each warning, with columns as follows.
The table can be sorted.
|
|---|---|
| file search field |
To search within the set of files in the analysis:
|
| file filter |
The options available from the Filter menu correspond to the names of
saved searches in the File domain. Select a
filter from the menu to filter the table contents according to
the corresponding search constraints. This menu corresponds to the Visible Files selector in the web GUI. See GUI Reference: Visibility Filter selector for information about the built-in filters and instructions for viewing the conditions associated with a saved search, removing a saved search, and creating a new saved search. |

The Procedures tab contains a table of the procedures encountered by the analysis, and provides functionality for searching and filtering these procedures.
| table of procedures |
The procedures in the analysis, or a subset defined by the
procedure filter setting and the
most recently executed search (if
any). There is one row for each warning, with columns as
follows.
The table can be sorted.
|
|---|---|
| procedure search field |
To search within the set of procedures in the analysis:
|
| procedure filter |
The options available from the Filter menu correspond to the names of
saved searches in the Procedure domain.
Select a filter from the menu to filter the table contents
according to the corresponding search constraints. This menu corresponds to the Visible Procedures selector in the web GUI. See GUI Reference: Visibility Filter selector for information about the built-in filters and instructions for viewing the conditions associated with a saved search, removing a saved search, and creating a new saved search. |
The Warning view provides detailed information about a warning issued by the CodeSonar analysis.
The following annotated screenshot shows the various parts of an Analysis Report view.

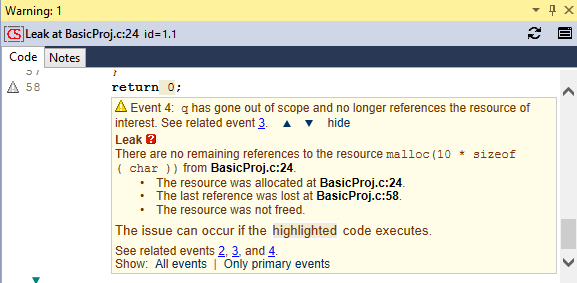
The Code tab contains an annotated code excerpt that shows the context in which the warning was issued. CodeSonar provides additional information to explain the conditions leading to the warning and aid in diagnosis:
| Path Names | Provided at the top of the excerpt. Click to open the Visual Studio source listing for the file (if it is not already open). |
|---|---|
| Line Numbers | Correspond directly to line numbers in the file. Click to open the Visual Studio source listing for the file (if it is not already open) and scroll to the specified line. |
| Explanation Information |
Significant locations in the excerpt are annotated.
|
| Interaction/Navigation | Interaction and navigation functionality in the Code tab are as described in Warning Report: Interaction and Navigation |
| Source Coloring |
Along with syntax coloring (described in Source Coloring and
Hyperlinking), the source excerpt has background coloring
to aid in interpreting the warning.
|
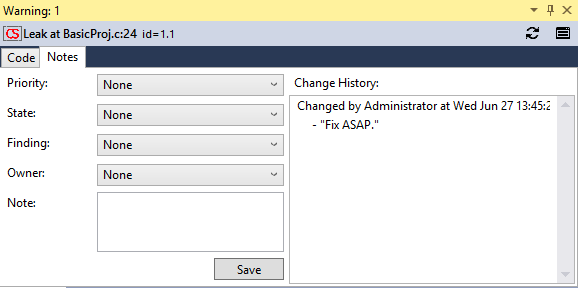
The Notes tab contains fields for viewing and editing the warning's user-modifiable properties, plus a change history. Note that all these properties apply to warning groups (not individual warning instances).
| Priority, State, Finding, Owner | Select a new values from the pull-down menus, and click OK. (New, custom values can be defined from the web GUI). |
|---|---|
| Note | Enter a new note in the field, and click OK. |
| Change History | The sequence of comments attached to this warning. These consist of all the user Notes added to the warning, plus all the messages automatically generated by CodeSonar when a user changes the warning's Priority, State, Finding, or Owner. |
There are various situations in which you may need to sign in to the CodeSonar hub. For example:
The hub username and password are stored as project properties. There are two options for specifying the hub username and password for a project:
The hub authentication dialog will open if you attempt to modify a warning Priority/ State/Finding/Owner, or add a Note to a warning, for a project that does not already have a hub username and password stored as project properties.

The username and password you provide will be stored as project properties and used to authenticate future modifications for the same project.
The following sections provide detailed information about installing and using the CodeSonar plug-in for Visual Studio.
To report problems with this documentation, please visit https://support.codesecure.com/.