JavaScript is not currently enabled, but is required for full
CodeSonar manual search and browse functionality.
If you are viewing this file in your hub's Web GUI, enable
JavaScript in your browser: you will also need it for GUI
functionality.
If you opened this file directly from disk, your browser may be
directly suppressing JavaScript functionality: certain browsers
perform this suppression on local files (but not files delivered by
web servers) for security reasons.
-
If you access the manual through the hub's Web GUI, the
functionality will not be suppressed because the hub is a web
server.
-
Alternatively, your browser may allow you to explicitly
disable the security setting that suppresses functionality. See
the CodeSonar
FAQ for more information.
CodeSonar Plug-in for Visual Studio: Tutorial [Windows only]
This tutorial introduces you to the CodeSonar plug-in for
Visual Studio using a sample program that is provided with the
product.
You will use the plug-in to build and analyze the sample
program, then to browse and interpret the analysis results.
If you have not already installed the CodeSonar plug-in for Visual
Studio, install and configure
it now.
We use the sample BasicProj.c
file provided with the Basic Tutorial.
Now set up the sample Visual Studio project ready for building and
analyzing with CodeSonar.
- Start Visual Studio, if it is not already running.
- Create a new Visual Studio project containing the
BasicProj.c.
- Select File > New >
Project from the main menu bar.
A New Project dialog will
open.
- Click Empty Project to
select it.
- Enter csBasicVisualStudio
in the Name field.
- Click the Browse button next to the Location
field, then use the dialog that opens to select your working
directory.
- Click OK.
The csBasicVisualStudio
project will now be shown in the Solution Explorer panel.
- Right-click on the Source
Files folder and select Add
> Existing Item.
- Navigate to your working directory and select BasicProj.c.
- Click Add.
BasicProj.c will be visible in
the Source Files folder.
- Set up the project properties.
You will set the project's analysis
mode to Hook mode, specify a CodeSonar hub to manage the
analysis results, and enter your
hub credentials. You will only need to do this once for each
project.
- In Solution Explorer, right-click on the
csBasicVisualStudio
project.
A menu will open.
- Select CodeSonar >
Properties from the menu.
Visual Studio will display the Properties dialog for the
project, with the
CodeSonar project properties selected.
- Enter your hub
location in the Hub address field.
- Specify your authentication credentials in the
Authentication Type section.
- Set
Authentication type to Password.
- Enter the username
and password
for your hub user
account in the corresponding form fields.
-
Specify additional
build/analysis properties in the Build/Analyze
section.
- Select Hook build.
- Select Local Analysis.
- Click Apply, then OK.
- Right-click on the project again, and select CodeSonar >
Enable > Hook Build from the menu (if it is not already
selected).
A dialog will open, explaining that enabling hook build will
trigger a clean on the selected project.
- Click OK.
The Visual Studio project is now set up to work with
CodeSonar.
- In the Solution Explorer,
right-click on the csBasicVisualStudio project.
A menu will open.
- Select CodeSonar > Build/Analyze
Project from the menu.
A dialog will open, explaining that the analysis completed and
asking if you want to save changes. Click OK.
The Analysis
Report view will open to show the progress and current results
of the analysis.
The Analysis Report panel will look (something) like the
following.
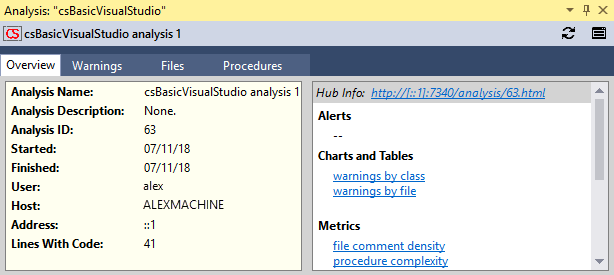
Initially the panel will show the Overview
tab.
We will look at some the warnings issued by the analysis.
- Switch to the Warnings
tab.
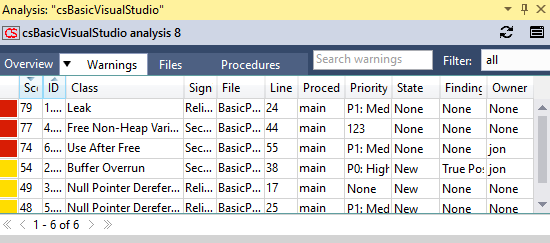
- If necessary, resize the columns so you can read the table
contents comfortably.
- Double-click the table entry for the "Null Pointer
Dereference" warning that occurs on line 17.
- The source listing for BasicProj.c will open, and scroll to the
warning location.
- The Warning
view for the warning will open.
- Look at the source listing.
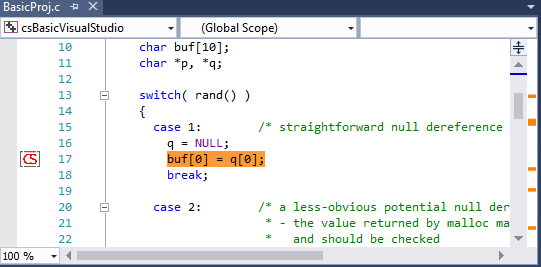
- Information
about the warning is overlaid on the listing.
-
- The source code at the warning location is
highlighted.
- A warning marker is shown in the left margin at the
warning location.
- Orange markings to the right of the scrollbar show warning
locations within the file (including the location of the
current warning).
- Look at the warning
panel.
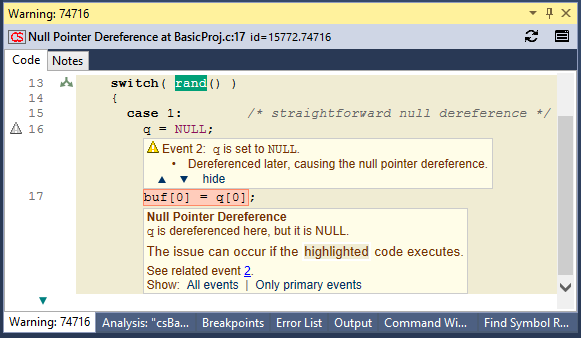
- The Warning panel header contains basic identifying
information about the warning, in the following format.
- Initially the view will show the Code
tab, which contains an annotated code excerpt that shows
the context in which the warning was issued.
- Scroll through the Warning panel to see its contents.
- Try hovering and clicking on various elements to see what
happens. For example:
- macro
names such as NULL
- line numbers
- control
flow markings
 ,
,  , and
, and  (in the left
margin, to the right of the line numbers)
(in the left
margin, to the right of the line numbers)
- data
event markings
 (in the left
margin, to the left of the line numbers)
(in the left
margin, to the left of the line numbers)
- the source file path (at the top of the excerpt)
- excerpt expansion links
 and
and  (at the top and bottom of the
excerpt)
(at the top and bottom of the
excerpt)
- "See related event" links
- Switch to the Notes
tab.

- Use the pull-down menus to specify a Priority,
State,
Finding, and
Owner
for this warning.
- Enter a note in the
Note field.
- Click the Save button. The Change History will
update to include a notification for the changes you just
made.
These changes were made on the CodeSonar hub, so all hub users will
be able to see them.
- Click
 (at the top
right of the Warning view).
(at the top
right of the Warning view).
The web GUI Warning
Report page for this warning will open in your web
browser.
- Check to confirm that your updated warning annotations are
displayed in the web GUI.
This is the end of the Visual Studio Tutorial. If you like, you
can go to the tutorial index and
choose another tutorial exercise.
The tutorial steps described above require you to have the
following permissions for the root project
tree: ANALYSIS_READ, ANALYSIS_TERMINATE, ANALYSIS_WARNING_EXISTS, ANALYSIS_WARNING_READ, PROJECT_ADD_CHILD, PTREE_ADD_CHILD.
If you don't have all these permissions root project
tree, but do have the corresponding permissions for a different
project tree or project, you can do this tutorial with minor changes.
There are two cases.
-
Case 1: there is some project tree T such that your
hub user account has ANALYSIS_READ T, ANALYSIS_TERMINATE T, ANALYSIS_WARNING_EXISTS T,
ANALYSIS_WARNING_READ T, PROJECT_ADD_CHILD T, and PTREE_ADD_CHILD T.
-
Case 2: there is already a project P on your hub
for analyzing BasicProj.c, and
your hub user account has ANALYSIS_READ P, ANALYSIS_TERMINATE P, ANALYSIS_WARNING_EXISTS P,
ANALYSIS_WARNING_READ P, and
PROJECT_ADD_CHILD P. You do not
need any PTREE_ADD_CHILD
permission in this case.
The following sections provide detailed information about
installing and using the CodeSonar plug-in for Visual Studio.