JavaScript is not currently enabled, but is required for full
CodeSonar manual search and browse functionality.
If you are viewing this file in your hub's Web GUI, enable
JavaScript in your browser: you will also need it for GUI
functionality.
If you opened this file directly from disk, your browser may be
directly suppressing JavaScript functionality: certain browsers
perform this suppression on local files (but not files delivered by
web servers) for security reasons.
-
If you access the manual through the hub's Web GUI, the
functionality will not be suppressed because the hub is a web
server.
-
Alternatively, your browser may allow you to explicitly
disable the security setting that suppresses functionality. See
the CodeSonar
FAQ for more information.
Task: Set Up and Perform a Remote-Managed Analysis
In a remote-managed analysis, the project build
phase runs locally and then data and control are transferred to
a remote analysis launch daemon, which manages the analysis
phase and continues to manage the analysis after it transitions
to daemon
mode.
To set up and perform a remote-managed analysis, you will first
set up or identify a suitable remote launch daemon, then
issue a build/analysis command that specifies that the analysis
must be managed remotely by this launch daemon.
See Analysis:
Local and Remote Analysis Management for more information.
A remote-managed analysis is performed as
follows.
- The CodeSonar project build phase runs locally to collect all
necessary information about the project and store it in the project
build directory.
- At the beginning of the CodeSonar project analysis phase, data
and control are transferred to a remote analysis launch
daemon.
- CodeSonar uploads the entire project build directory to the
hub.
- The hub sends the project build directory to the remote
analysis launch daemon for analysis.
- The remote analysis launch daemon stores its own copy of
the project build directory: this copy is the project analysis
directory.
- The analysis launch daemon initiates the CodeSonar
analysis, operating on the project analysis directory.
Remote-managed analysis has several advantages. In particular:
- The remote analysis daemon manages a separate project
analysis directory for each analysis.
- If you are initiating the CodeSonar analysis in a
continuous integration pipeline or similar, the project
analysis directory will not be lost when pipeline data is
cleaned up.
- Source file
listings and procedure-granularity metrics
for older analyses are not overwritten by newer analyses and
remain available until the project analysis directory is
deleted (explicitly
or via auto-deletion).
- If your remote launch daemon is on a different machine, the
analysis will not consume resources on your local machine.
The process for setting up and performing a
remote-managed analysis can be divided into two steps.
Once you have set up a remote launch daemon, you can continue
using it for subsequent analyses of the same project and for analyses
of different projects.
If you haven't performed a CodeSonar build/analysis before,
work through the Basic
Tutorial before proceeding.
Note on Remote-Managed Daemon Mode
This task describes how to set up an analysis that is
remote-managed in both the analyze interval and the daemon
mode interval.
- In the analyze
interval, the CodeSonar project is finalized and analyzed.
- In the daemon mode
interval, the analysis services requests from the hub for
information stored in the project analysis directory. For example,
if a user browses source code in the hub web UI, the hub will ask
the analysis process for that source code.
It is also possible to specify separate remote management for the
daemon mode interval, using the -remote-archive archive-launchd option. For
more information, see Analysis:
Daemon Mode Management.
You will need the following permissions.
To create a new launchd group as a child of the root launchd group
and then start new launch daemons in your new group:
To perform an analysis of project P:
Suppose your hub is located at http://hubmachine:7340 and you are using
hub user account alex to authorize
the various CodeSonar operations in this task.
We will create a new launchd group
called alex_remotes, then create a
new launch daemon as a
member of that group.
- Select the machine on which you will run your remote launch
daemon.
- It must be running the same version of CodeSonar as the
machine on which you will start the analysis.
- It must be able to access the hub.
- It can be a different machine from your local machine, but
is not required to be.
The remainder of these instructions will refer to this machine as
rdmachine.
- Create your new launchd group in the hub GUI.
- Sign into the hub GUI as alex.
- Navigate to URL http://hubmachine:7340/manage_launchd.html.
This is the hub's Analysis Cloud
page.
- Click the Create New Launchd Group link (under the
page heading).
A form will open.
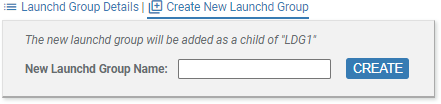
- Enter alex_remotes in the
New Launch Group Name field, then click Create.
The table of launch daemons will update to include your
new launchd group.
- Create the new launch daemon from rdmachine.
- Sign in to rdmachine.
- Create a new directory on rdmachine to contain your launch
daemon's home directory.
mkdir /usr/alex/launchds
If you start additional launchd daemons on rdmachine, you can place their home
directories under /usr/alex/launchds as well.
- Run the following command to create the launch
daemon.
codesonar install-launchd -auth password -hubuser alex
\
-launchd-group /alex_remotes
-launchd-key alexremoteA \
-launchd-home /usr/alex/launchds/arA
-max-processes auto \
http://hubmachine:7340
where the various command elements are interpreted as
follows.
| -auth password
-hubuser alex
|
Hub user account alex is authorizing this command,
and you will be using password-based
authentication.
CodeSonar will always behave as if alex has
all LAUNCHD_*
permissions for the new launch daemon.
For other authentication options, see
Hub Authentication: Authenticated codesonar Subcommands. |
| -launchd-group /alex_remotes
|
Create the new launch daemon in the alex_remotes launch group that you
just created. |
| -launchd-key
alexremoteA
|
Provides a unique identifier for the new launch
daemon. If you start additional launch daemons on
rdmachine, you can
distinguish them by specifying different key
values. |
| -launchd-home /usr/alex/launchds/arA
|
The home
directory for the new launch daemon will be at the
specified path. Analysis directories for all analyses
that are remote-managed by this launch daemon will be
stored in the directory tree under /usr/alex/launchds/arA.
A launch daemon with no home directory cannot be the
analysis launch daemon for a remote-managed
analysis.
|
| -max-processes auto
|
Let CodeSonar determine the launch daemon process
limit automatically. |
| http://hubmachine:7340
|
Connect the launch daemon to this hub. |
For more information, see the codesonar install-launchd
documentation.
- When prompted, enter the password for alex.
- [Windows only] You will be prompted for Windows credentials
to authorize running the launch daemon as a service.
- If you want to run the launch daemon as a service,
provide credentials for an account with Windows
"Administrator" privileges for the current
machine.
We recommend running as a service, especially because it
means that the launch daemon will restart automatically if
your machine is restarted.
- Otherwise, click Cancel.
- Check that your new launch daemon is showing up in the hub
analysis cloud.
- Sign into the hub GUI as alex.
- Navigate to the hub's Analysis Cloud page at
URL http://hubmachine:7340/manage_launchd.html.
- Click the table row for your alex_remotes launch group.
The Launchd Group page will open.
- Inspect the table of launch daemons. There should be one
entry, representing the launch daemon you just started.
- If you wish, start more launch daemons and add them to the
alex_remotes launch group. They do
not all have to be on rdmachine,
but the machine or machines must be running the same version of
CodeSonar as the machine on which you will start the analysis and
must be able to access the hub.
You can run the analysis from your local machine, or from another
machine in your organization. You can also run the analysis inside a
container. The requirements are the same in each case:
- CodeSonar must be installed, and be the same CodeSonar version
that is running the launch daemon that you started in step 1.
- The machine (or container) must be able to communicate with
your hub.
Starting a remote-managed CodeSonar analysis is extremely similar
to starting a local-managed analysis. The only difference is that you
will specify that the analysis is to be remote-managed by a launch
daemon in your newly-created /alex_remotes launchd group.
Suppose your CodeSonar project is called ProjectX.
- Build and analyze a CodeSonar project
| command line |
Specify -remote
"/alex_remotes/*" in your codesonar analyze command.
For example, if you usually build your software with
make all, your
build/analysis command will be something like:
codesonar analyze ProjectX -remote
"/alex_remotes/*" \
-auth password -hubuser alex
riddle2:7348 make all
- If you are using CodeSonar SaaS, specify -remote "/saas/*"
instead of -remote
"/alex_remotes/*".
- If you are using CodeSonar
with a continuous integration tool, the codesonar command must also include
the -wait option. This is important in
order to ensure that the CI job does not appear to
complete before the analysis is finished, and also in
some cases to prevent the CI tool from killing the
analysis process.
(Note that -foreground
cannot be used with -remote.)
For more information, see Command Line
Build/Analysis.
|
| Windows build wizard |
On screen 1 of the Windows build wizard, set the
Analysis field to Custom and then enter
"/alex_remotes/*" in
the adjacent field.
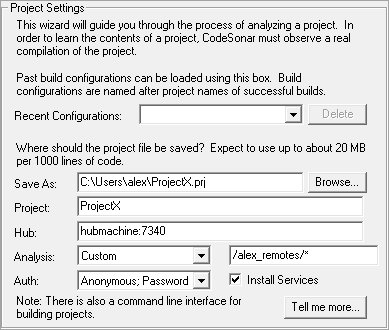
If you are using CodeSonar SaaS, set Analysis to
SaaS instead of
Custom.
Fill out the remaining fields and screens as usual, then
build your software project and Finalize the
CodeSonar build/analysis.
|
- In the hub GUI, open the Analysis page for the analysis
you just performed.
- Expand the Analysis Details section using the link under
the page heading.
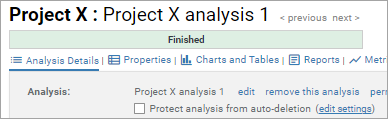
- Inspect the .prj_files information at the bottom of the
expanded Analysis Details. These fields describe various properties
of the project analysis directory.
- The .prj_files location will be underneath the
launch daemon home directory you specified in step 1.
- .prj_files size is the total disk space used by the
project analysis directory.
- .prj_files available space (if known) is the
available space on the disk where the project analysis
directory is located.
- There is a link to remove the
directory.
You may wish to do one or more of the following.
- Start additional launch daemons in your new /alex_remotes launchd group.
Use distinct key values to distinguish launch daemons with the same
machine,
system
user, hub
user, and CodeSonar installation.
- Set up more launchd groups
containing launch daemons for remote analysis.
Possible use cases include the following.
- A separate launchd group for each project.
- Different launchd groups for different analysis needs. For
example, you could have one launchd group for brief, frequent
analyses and a different one for large, deep analyses.
- Different launchd groups for different sets of users. You
can use CodeSonar's Role-Based Access
Control to restrict access to specific launchd groups.
- Adjust your build/analysis command to specify an individual
launch daemon for remote analysis, rather than specifying a launchd
group and letting CodeSonar select a launch daemon from that group.
- Use -remote-archive archive-launchd to specify
a separate launch daemon for remote-managing the daemon
interval.
If you are using -remote-archive with a continuous
integration tool, your codesonar
analyze command must also specify either -foreground or -wait, but not both.
- If you are also using -remote then the command must
specify -wait, because
-remote cannot be used
with -foreground.
- If you are using -remote-archive but not
-remote then it is
usually better to specify -foreground. This will allow you
to avoid complications that can arise from trying to run
background services from inside CI jobs.
For more information, see the option documentation (-remote-archive, -remote, -foreground, -wait), along with Analysis:
Daemon Mode Management.