JavaScript is not currently enabled, but is required for full CodeSonar manual search and browse functionality.
If you are viewing this file in your hub's Web GUI, enable JavaScript in your browser: you will also need it for GUI functionality.
If you opened this file directly from disk, your browser may be directly suppressing JavaScript functionality: certain browsers perform this suppression on local files (but not files delivered by web servers) for security reasons.
| CodeSonar® 9.2p0 | CONFIDENTIAL | CodeSecure Inc |
Use this page to specify the SSL/TLS hub server certificate and client authentication certificate for the hub, and to enable/disable HTTPS.
Important note: if you configure a hub server certificate that is not trusted by the web browsers and other HTTPS clients on your system (in particular, if you configure a self-signed certificate), you and other users will experience HTTPS warnings when you attempt to access the hub. See Browser Warnings and Self-Signed Certificates for more information about this issue and how to resolve it.
Important Note: the CodeSonar Web GUI makes extensive use of JavaScript. Make sure JavaScript is enabled in your web browser.
The Configure HTTPS page can be reached in any of the following ways.
| From Settings: | Click the configure link in
the HTTP
tab. (This will only be available if you have G_ADMINISTER_HTTP_SETTINGS permission.) |
|---|---|
| By URL: | http://hub_location/configure_https.html |
| Output formats | none | ||
|---|---|---|---|
| Visibility Filter Applied | none | ||
| RBAC Permissions Needed |
|
The initial appearance of the Configure HTTPS page depends on whether or not HTTPS is currently enabled on the hub.
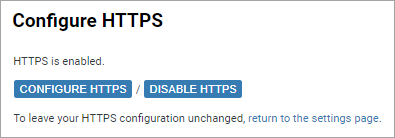
If HTTPS is currently enabled, the Configure HTTPS page will initially display the following contents.
If HTTPS is currently disabled, or it is enabled and you have clicked the Configure HTTPS button, the full Configure HTTPS page is displayed.
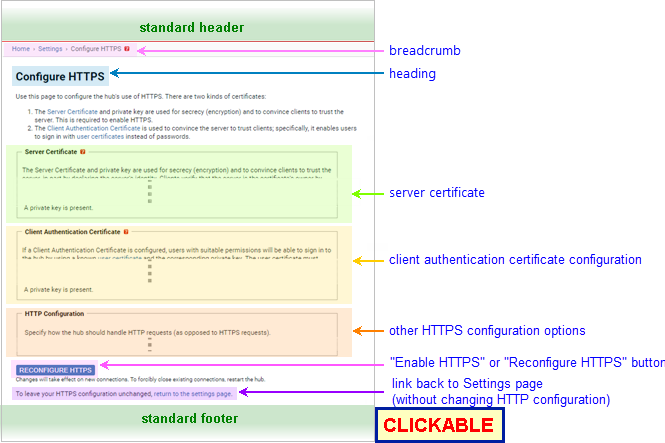
| Standard Header | See GUI Reference: Standard Header. |
|---|---|
| Breadcrumbs |
Home > Settings > Configure HTTPS where |
| Page Heading | Configure HTTPS |
| Server Certificate Configuration | Specify a certificate and private key for the hub's HTTPS interactions. See Server Certificate Configuration, below, for details. |
| Client Authentication Certificate Configuration | Specify whether or not hub users will be able to sign in with user certificates, and, if so, the client authentication certificate that will be used to authenticate those user certificates. See Client Authentication Certificate Configuration, below, for details. |
| HTTP Configuration | Specify other properties for the hub's HTTPS configuration. See HTTP Configuration , below, for details. |
| "Enable HTTPS" or "Reconfigure HTTPS" button | Click to configure (or reconfigure) HTTPS on the hub, using
the settings you have specified in the Server Certificate Configuration,
Client
Authentication Certificate Configuration, and HTTP Configuration sections. HTTPS will be enabled on the hub after you click this button. |
| Link back to Settings page | Click the link to navigate back to the Settings page without changing the HTTPS configuration or enabling status. |
| Standard Footer | See GUI Reference: Standard Footer. |
The server certificate configuration establishes a key pair and certificate (which we call the hub server certificate) for the hub to use in establishing and securing HTTPS connections.
The hub server certificate requirements are as follows.
The server certificate configuration options are shown in the following table.
| Option | Additional Details |
|---|---|
| Keep Current Configuration [default if certificate already configured, or has been in the past] |
Select this option if:
When this option is selected, the Server Certificate
Configuration section will contain a notation specifying
that a private key is present. |
| Generate Self-Signed Certificate
[default if no current configuration] |
The hub will generate a key pair and certificate to use in
securing HTTPS sessions. The certificate will be self-signed by
the hub. (See the note on
self-signed certificates below.)
To configure this option:
|
| Upload Private Key and
Certificate(s) |
The hub will use an uploaded private key and certificate (or
certificate chain) to secure HTTPS sessions.
To configure this option:
|
The Client Authentication Certificate Configuration determines whether or not hub users will be able to sign in with user certificates, and, if so, the client authentication certificate that will be used to authenticate those user certificates. For full details, see TLS Certificates: Hub Client Authentication Certificate.
Each client authentication certificate configuration option corresponds to one of three configuration cases.
| Configuration Case | Configuration Effect | Corresponding Options (detailed below) |
|---|---|---|
| The hub has a client authentication certificate and corresponding private key. | Certificate-based user authentication is available. Existing user certificates can be uploaded to the hub; new user certificates can be issued by the hub. | Generate
Self-Signed Certificate, Same as Server Keys, Upload Private Key and Certificate(s) |
| The hub has a client authentication certificate, but not the corresponding private key. | Certificate-based user authentication is available. Existing user certificates can be uploaded to the hub, but the hub cannot issue user certificates. | Upload Certificate(s) Only |
| The hub does not have a client authentication certificate or keys. | Certificate-based user authentication is not available. | Disable Certificate-Based Authentication. |
Note that enabling HTTPS and configuring a client authentication certificate is not in itself sufficient to allow users to use certificate-based authentication. A user must also have one or more user certificates configured, and must have both G_SIGN_IN and G_SIGN_IN_CERTIFICATE permission.
The client authentication certificate requirements are as follows.
The client authentication certificate configuration options are shown in the following table.
| Option | User Certificate Authentication | Hub Can Issue User Certificates? | Additional Details |
|---|---|---|---|
| Keep Current Configuration [default if certificate already configured, or has been in the past] |
enabled | as noted under selector |
Select this option if:
If HTTP is currently enabled, it will also contain information about the certificate and provide a link for downloading the certificate (but not the private key) in PEM format. |
| Generate Self-Signed
Certificate [default if no current configuration] |
enabled | yes |
The hub will generate a separate key pair and self-signed
certificate for user authentication.
To configure this option:
|
| Same as Server Keys | enabled | yes |
The hub will not have a separate key pair and certificate for
user authentication: instead, it will use the same keys and
certificate as it uses for server certificate
configuration.
To configure this option, select Same as Server Keys, make any other Server Certificate or HTTP Configuration changes you want, then click the Enable HTTPS or Reconfigure HTTPS button. Note: do not select this option if you selected Generate Self-Signed Certificate in the Server Certificate Configuration section. Instead, select Generate Self-Signed Certificate in this section as well. |
| Upload Private Key and Certificate(s) | enabled | yes |
The hub will use an uploaded key pair and certificate for user
authentication.
To configure this option:
|
| Upload Certificate(s) Only | enabled | no |
The hub uses an uploaded certificate for user authentication,
but does not have access to the corresponding private key. This
means that users cannot generate certificates using the hub as
a certificate authority, and must provide existing certificates
that are trusted by the hub certificate (that is, certificates
that have been signed with the same private key).
To configure this option:
|
| Disable Certificate-Based Authentication | disabled | not applicable |
Select this option if you don't want any users to be able
to sign into the hub using certificates. Users with sufficient
permissions will still be able to sign in with passwords.
Settings and Account Editor pages will not provide links to the User Certificates page, and any user certificates already configured for a user will be ignored. To configure this option, select Disable Certificate-Based Authentication, make any other Server Certificate or HTTP Configuration changes you want, then click the Enable HTTPS or Reconfigure HTTPS button. |
The HTTP Configuration section provides other HTTPS configuration options.
There is currently one setting in this section: HTTP, which specifies how the hub should respond to HTTP (as opposed to HTTPS) requests. There are two options for this setting:
| redirect to the equivalent HTTPS
URL [default] |
When a user attempts to connect to the hub using an HTTP URL,
the hub will redirect the connection to an URL that differs only
by specifying https rather than
http as the protocol. For example, if a user attempts to connect to http://myhub:7340, the hub will redirect them to https://myhub:7340. |
| always fail | When a user attempts to connect to the hub using an HTTP URL,
the hub will refuse the connection. For example, if a user attempts to connect to http://myhub:7340, the hub will send a "bad request" response. |
Both server certificate configuration and client authentication certificate configuration provide the option of generating a key pair and self-signing a certificate. While the generated certificates have different uses, the forms have the same fields as described in the following table.
| Form field label | Use in generated certificate |
|---|---|
| Country | Both Issuer Country and Subject Country. |
| State or Province | Both Issuer State and Subject State. |
| City | Both Issuer City and Subject City. |
| Company | Both Issuer Organization and Subject Organization. |
| Organizational Unit | Both Issuer Unit and Subject Unit. |
| Common Name | Both Issuer Name
and Subject
Name. This must match the hostname or IP address that hub clients will use in hub URLs, as noted above. |
| Email Address | Both Issuer Email and Subject Email. |
| Certificate Valid For ... days | Begins will be the date and time at which the key pair and certificate was generated, Expires will be the date and time calculated by adding the specified number of days to the Begins value. |
For best security, we recommend purchasing a hub server certificate from a trusted certificate authority. However, you can use a self-signed certificate if you wish, and the Configure HTTPS page provides functionality for generating a self-signed certificate if you do not already have one suitable for this purpose.
If you configure a hub server certificate that is self-signed (or otherwise not trusted by the web browsers and other HTTPS clients on your system), you and other users will experience HTTPS warnings when you attempt to access the hub. See Browser Warnings and Self-Signed Certificates for more information about this issue and how to resolve it.
A self-signed client authentication certificate is normal and recommended. We provide the option of uploading an existing client authentication certificate in case you already have a certificate appropriate for use as a client authentication certificate and a corresponding set of suitable user certificates and wish to use these for hub authentication, but most organizations will not be in this position.
| Settings | Click return to the settings page at the bottom of the page. |
|---|
To report problems with this documentation, please visit https://support.codesecure.com/.